A Beginner’s Guide to Tracking Conversions in WordPress (The Easy Way)
Tracking conversions in WordPress can be confusing for many site owners. Setting up tools like Google Tag Manager or custom code snippets often requires technical knowledge, and tutorials can be hard to follow.
At the same time, the questions are simple: “How many people click my ‘Buy Now’ button?” or “Is my contact form working?”
WP Insights Pro lets you set up conversion tracking in WordPress without writing code. This guide will show you how to configure your first two conversion goals in just a few minutes.
First, What Are We Even Tracking? Events vs. Goals
Before we start, let’s quickly clarify two key terms:
- An Event: Think of this as a specific interaction. A visitor clicking a button is an event. A visitor seeing your pricing section is an event. It’s a single, measurable action.
- A Goal: This is the finish line. A goal is an event (or a page visit) that you’ve defined as a key conversion for your business. A “Contact Form Submit” event is a Goal. A “Thank You Page” visit is a Goal.
With WP Insights Pro, the process is simple: you first tell the plugin which interactions to watch for (Events), and then you tell it which of those events count as a conversion (Goals).
Goal #1: Tracking a Button Click
Let’s start with a common scenario: tracking clicks on a specific button, like a “Download Brochure” link or an external affiliate link. This is a perfect use case for the No-Code Event Tracker.
The process involves three simple steps: giving your button a unique identifier, telling WP Insights Pro to track that identifier, and finally, defining that tracked action as a goal.
Step 1: Assign a CSS Class to Your Button
First, you need a way to uniquely identify the button you want to track. The easiest way is to assign it a specific CSS Class. Most page builders (like Elementor or Kadence Blocks) have an “Advanced” tab for any button or link where you can do this.
Edit your button and in the “Additional CSS Class(es)” field, give it a simple, memorable class name. For this example, let’s use cta-brochure-download.
Step 2: Tell WP Insights Pro to Track That Class
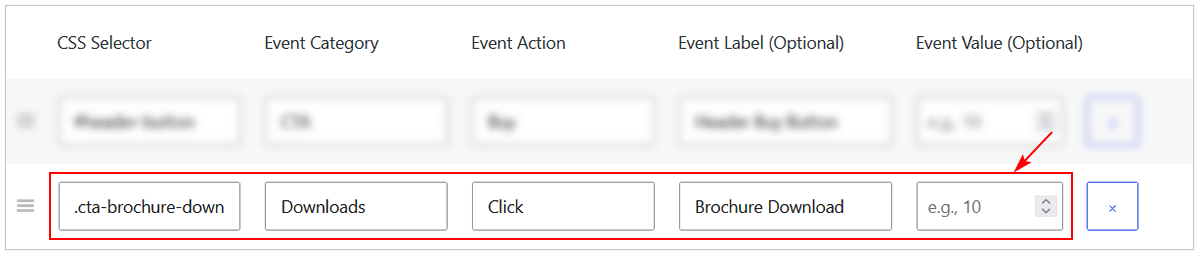
Now, head over to WP Insights > Settings and open the Auto-Tracked Events section. In the “Tracked Click Events” table, add a new row with the following details:
- CSS Selector: .cta-brochure-download (Don’t forget the dot . for a class!)
- Event Category: Downloads
- Event Action: Click
- Event Label: Brochure Download
Step 3: Turn that Event into a Goal
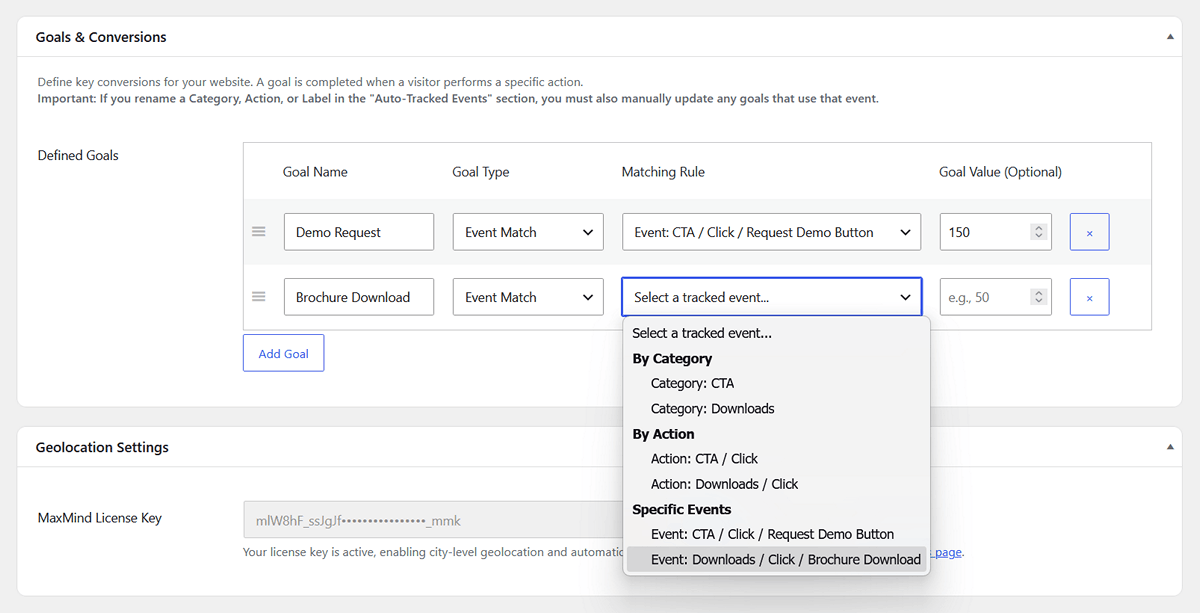
With the event now being tracked, the final step is to tell WP Insights Pro that this specific event should count as a conversion.
Go to the Goals & Conversions section and add your new goal:
- Goal Name: Brochure Downloaded
- Goal Type: Select Event Match
- Matching Rule: Click the dropdown. You will now see the “Downloads / Click” event you just created in the list. Simply select it.
Click “Save Changes”.
Goal #2: Tracking a Form Submission
Tracking a form submission is another crucial goal. WP Insights Pro gives you two easy ways to do this, depending on how your form is set up.
Method A: The Classic “Thank You” Page
This is the most common method. If your form redirects the user to a dedicated “thank you” page after they submit it, you can simply track visits to that page.
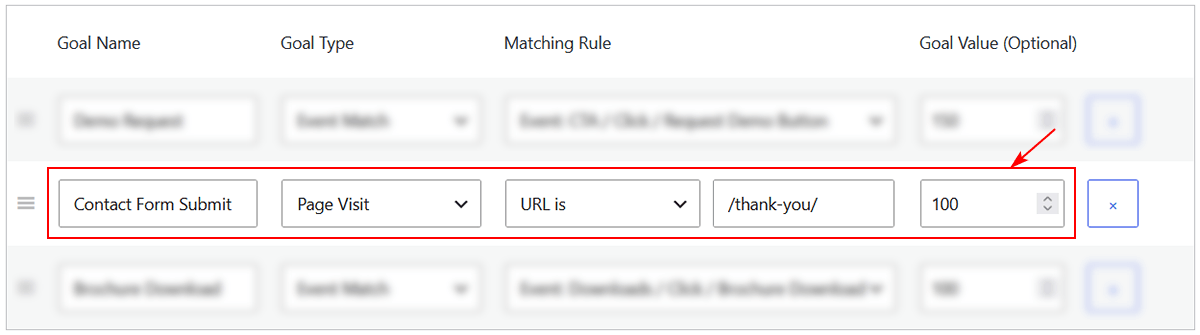
In the Goals & Conversions section, add a new row and fill it out like this:
- Goal Name: Contact Form Submitted
- Goal Type: Select Page Visit
- Matching Rule: URL is and then type the path to your thank-you page, like /thank-you/.
- Goal Value (Optional): Assign a value if you want. For a lead, you might assign a value of 100.
Method B: Direct Form Submission Tracking
What if your form doesn’t use a thank-you page? You can track the submission directly, using the same pattern we learned in Goal #1.
Step 1: Assign a CSS Class to Your Form
Edit the page containing your form and select the main Form block. In the block settings sidebar, open the “Advanced” panel and find the “Additional CSS Class(es)” field. Give your form a simple class. Let’s use contact-us-form.
Step 2: Tell WP Insights Pro to Track That Form
Go to Settings > Auto-Tracked Events and, in the “Tracked Form Submissions” table, add a new row:
- CSS Selector: .contact-us-form (Don’t forget the dot . for a class!)
- Event Category: Form
- Event Action: Submit
- Event Label: Contact Us Submission
Step 3: Turn the Event into a Goal
Go to the Goals & Conversions section and create a new goal, selecting your new “Form / Submit” event from the dropdown menu.
Track Your Conversions in the Dashboard
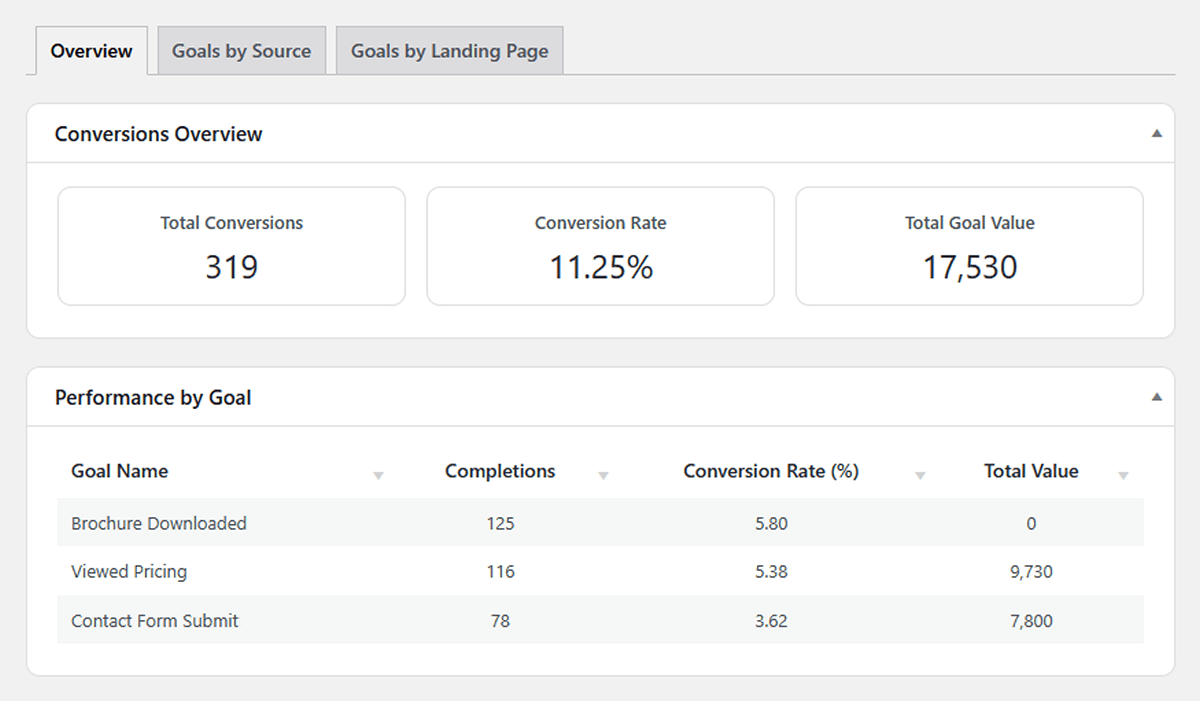
You’re all set! Now, as visitors interact with your site, you can head over to the Conversions report in your WP Insights Pro dashboard. You’ll see a clear overview of how your goals are performing, which traffic sources are driving the most conversions, and which landing pages are turning visitors into customers.
Tracking the interactions that matter on your site doesn’t have to be complicated. With the right setup, it can become a straightforward, useful part of managing your website.
Ready for Zero-Bloat Analytics?


